Looking for the best way to set up quantity-based discounts in WooCommerce?
With the Merchant plugin, you can easily set up functional and stylish bulk discount rules that look something like this:
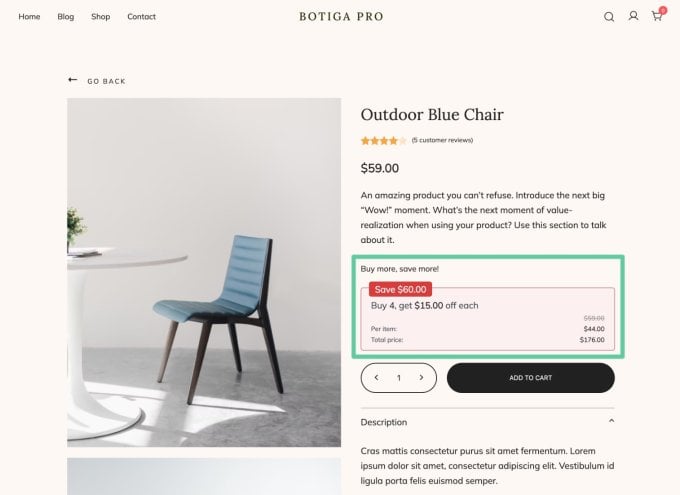
You’ll be able to set up your rules using a simple, non-technical interface and choose from various discount structures, such as percentage and flat-rate discounts.
Below, you’ll learn step-by-step how to create your own quantity-based discount rules using the Merchant plugin.
Let’s get to it!
Key Details for Quantity-Based Discounts in Merchant Pro
Before I get to the full step-by-step tutorial, I think it’s helpful to briefly share a high-level look at how WooCommerce quantity-based discounts work in Merchant Pro.
With the Merchant Pro plugin, you can create unlimited quantity-based discount rules for your store. To configure your rules in an optimal way, you get a number of helpful options:
- Product conditions – You can target your rules to products in different ways. You can apply the rule to all products, one or more individual products that you select, or all the products in one or more product categories.
- Quantity rules – You can choose exactly how many items a user must purchase to get the deal.
- Fixed or percentage discounts – You can choose between using fixed and percentage discounts for each rule that you set up.
- User conditions – You can make it so that only certain users can access the deal, with options to restrict to individual user accounts or entire user roles.
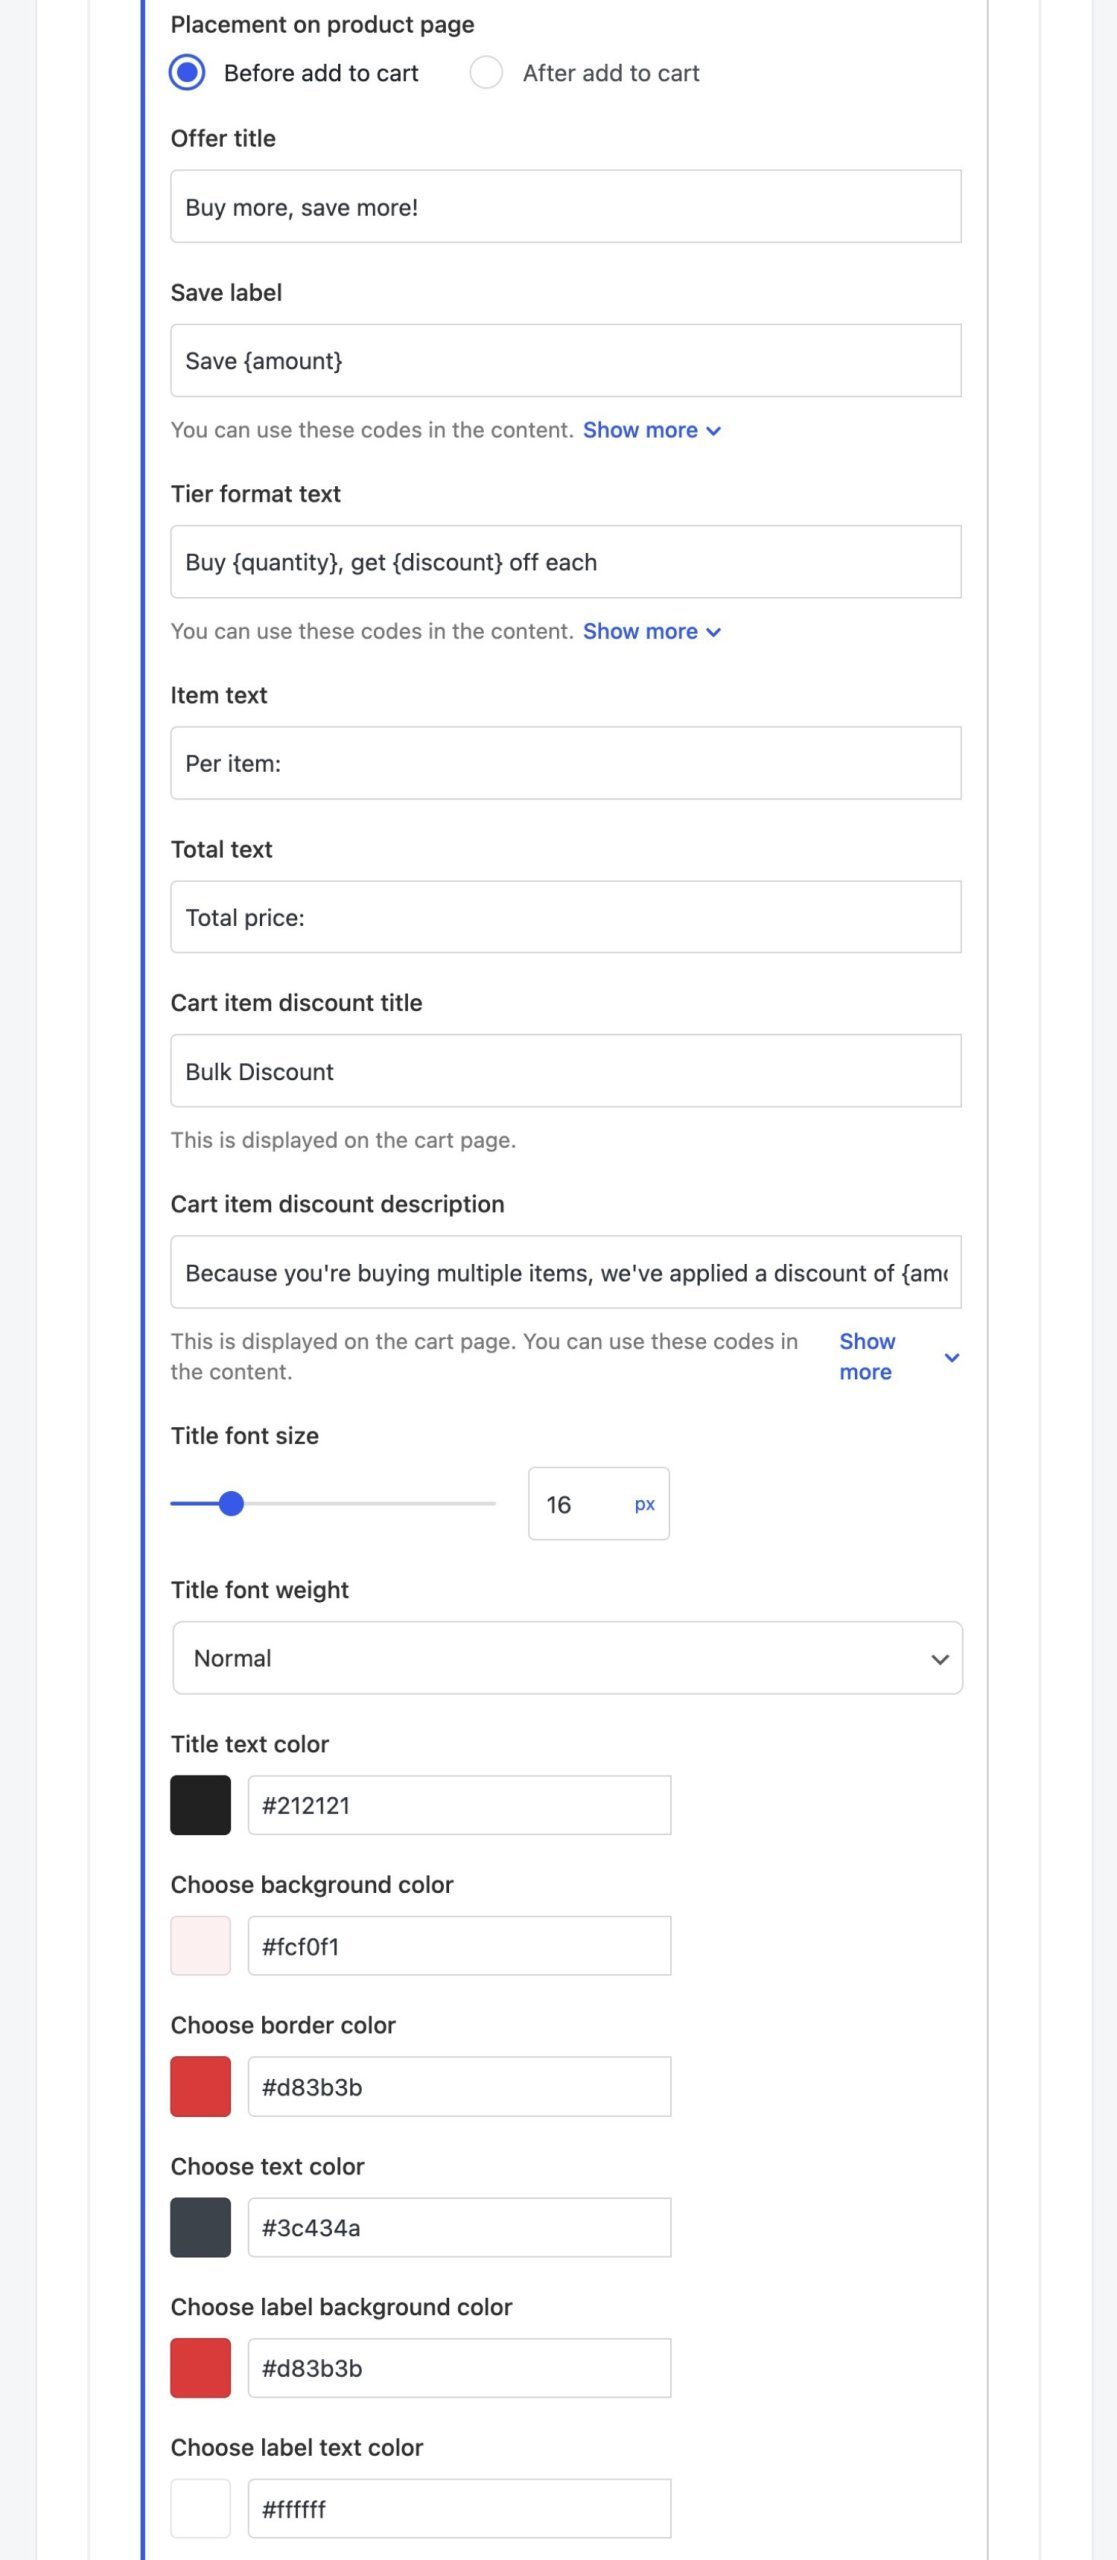
You can also fully customize the placement, design, and content of the bulk discounts box. You can edit and/or translate all of the labels and also tweak all of the colors to match your site’s design:
Merchant Pro is also not just a quantity-based discount plugin. It’s actually a full WooCommerce toolkit that includes 40+ modules to improve your store’s shopping experience, optimize your conversion rates, and boost your revenue.
While it includes a lot of different features, Merchant Pro is 100% modular, which means you can pick and choose exactly which features to load on your store. If you leave a module disabled, it won’t load any code on your frontend store. This lets you avoid bloat and keep your store loading fast.
While you’re free to only use the Bulk Discounts feature, you’ll probably find some other modules that can make a meaningful improvement to your store. You can check out all of the Merchant modules here if you want to learn what else is on offer.
How to Set Up Quantity-Based Discounts in WooCommerce
Now, let’s jump into the full step-by-step tutorial for how to set up your first bulk discount in just a few minutes.
1. Purchase, Install, and Activate Merchant Pro
To get started, you’ll need to install the Merchant Pro plugin on your store.
If you don’t already have a copy of Merchant Pro, you can purchase it here. The plans start at $79 for use on a single site and give you access to all 40+ modules in Merchant, including the Bulk Discounts module that you’ll use to set up quantity-based discounts.
After purchasing the plugin, you can download the plugin’s ZIP file and install it on your store just like any other plugin.
To make sure that your store is benefiting from automatic updates, you’ll also want to add your Merchant Pro license key to the plugin’s settings, which you can access by going to Merchant → Settings in your WordPress dashboard.
2. Enable the Bulk Discounts Module
As I mentioned earlier, Merchant uses a modular approach for all of its features, which helps keep your WooCommerce store lightweight and avoid bloat.
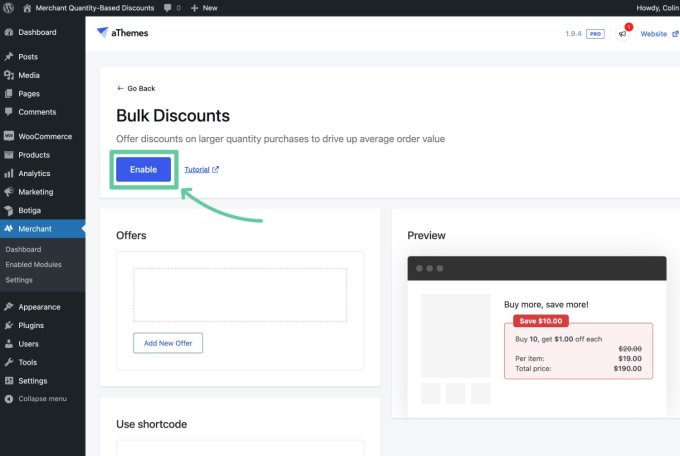
Therefore, to set up the quantity-based discounts functionality, you’ll first need to enable the Bulk Discounts module:
- Open your WordPress dashboard.
- Click on the Merchant option in your dashboard sidebar.
- Select the Bulk Discounts module (which is listed in the Boost Revenue section).
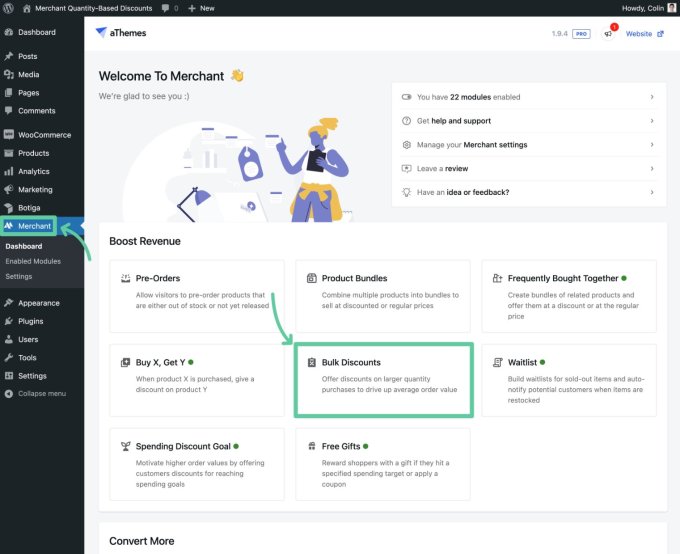
This will open a new page with the Bulk Discounts settings.
To enable the module, click the blue Enable button at the top of the interface:
3. Create Your First Quantity-Based Discount Offer
Once you’ve enabled the module, you can use the Offers box below to create your first quantity-based discount rule.
To get started, click the Add New Offer button:
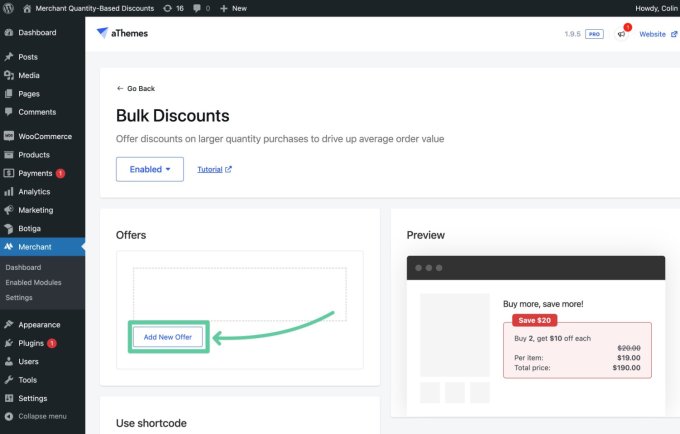
This will open a box where you can fully configure the discount rules.
First, give your offer an internal Offer name to help you remember it. Then, you can advance into configuring the actual deal.
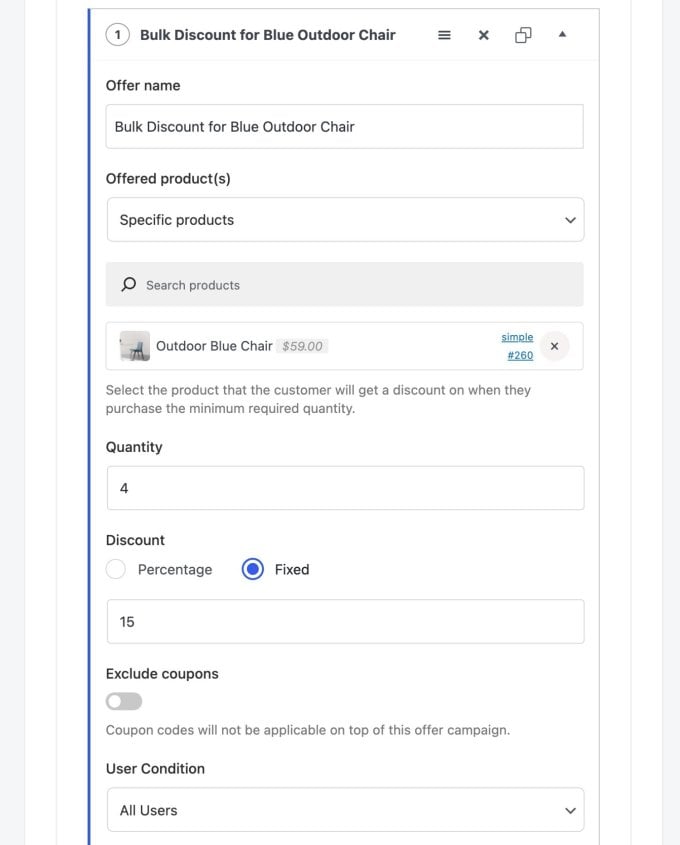
i. Configure the Products
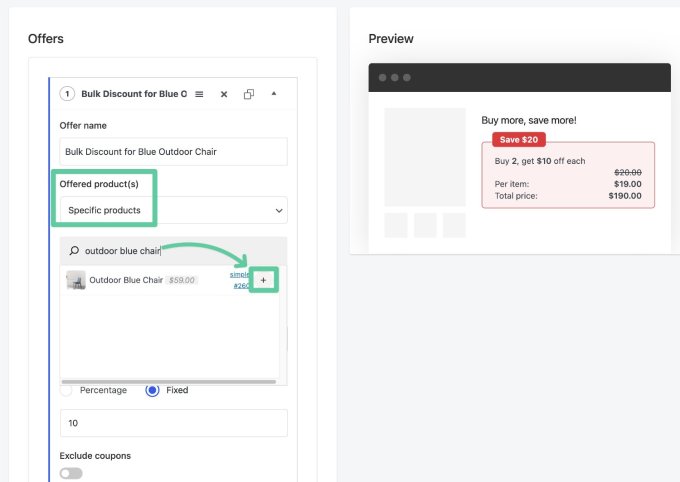
Next, use the Offered product(s) drop-down to choose how to target products for this discount offer. You have three options:
- Any product – This rule will apply to every single product in your store.
- Specific products – You can search for individual products by name that you want to add this rule to. You can apply the rule to a single product or to multiple products — it’s totally up to you. If you haven’t added the actual product(s) yet, you’ll need to add them (Products → Add New) before you can create the discount rule.
- Product categories – You can apply the rule to all of the products in a certain category. You can target the rule to a single category or to multiple categories.
For this example, let’s say that you want to set up a rule for a single product.
To do that, you would choose Specific products in the dropdown. Then, you would search for the product by name and select it when it appears in the search results:
If you want to, you’re free to search for and add multiple products. However, I’ll just create the rule for a single product in this example.
ii. Set Up the Discount Rules
Once you’ve chosen the product(s) for which you want to set up quantity-based discounts, you can set up the actual rules themselves:
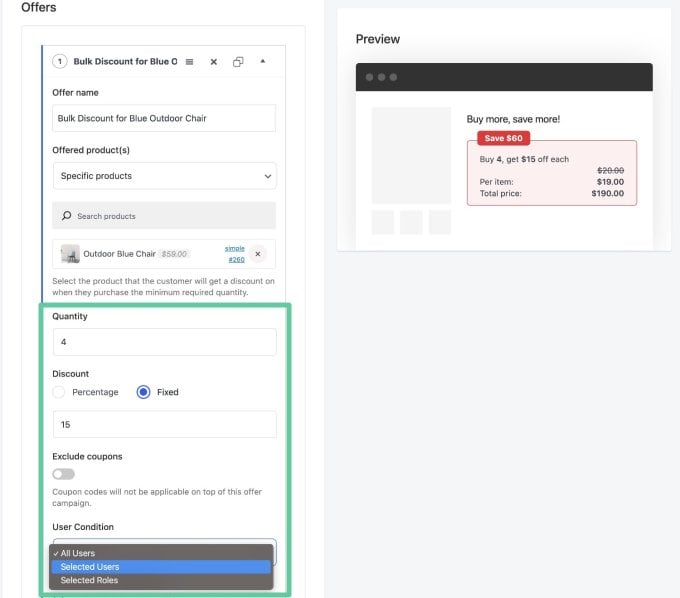
First, enter the quantity that you want to trigger the discount. For example, if you enter “4” in the Quantity box, shoppers would need to purchase four of the product(s) in order to receive the discount.
Below the Quantity box, you can set up the actual discount using the Discount settings.
First, choose the type of discount:
- Percentage – Discount a percentage (e.g. 10%).
- Fixed – Discount a fixed rate (e.g. $15). This discount applies to each individual item. So if you set the discount to $15 and the user purchases four items, they would get a total discount of $60 ($15 per-item discount times four items).
Then, enter the actual discount amount in the box below.
Below that, you can choose whether or not shoppers can still apply coupons to add further discounts on top of the quantity-based discount. By default, shoppers can do this, but you can disable this ability by turning on the Exclude coupons toggle.
Finally, you can choose which users can access the quantity-based discount. By default, all of your store’s shoppers will be able to use it.
However, you can also use the User Condition dropdown to make it so that only certain users can access the bulk discounted price.
For example, if you sell to both retail and wholesale customers, you could make it so that only shoppers with a special “Wholesale Customer” user role can access the discounts.
You get three different User Condition options in the drop-down:
- All Users – Every single user, including anonymous guests, can see and use the offer.
- Selected Users – You can search for one or more users by name and add them to the offer. Only the specific user accounts that you add here will be able to see and use the offer.
- Selected Roles – Only users with a certain user role will be able to see and view the offer. You can add the rule to a single role or multiple roles.
iii. Configure How to Display Your Quantity-Based Discount Offer
To finish things out, Merchant gives you a bunch of options to control how to display the quantity-based discount on the single product page.
That is, you can configure the location of this box and what it looks like:
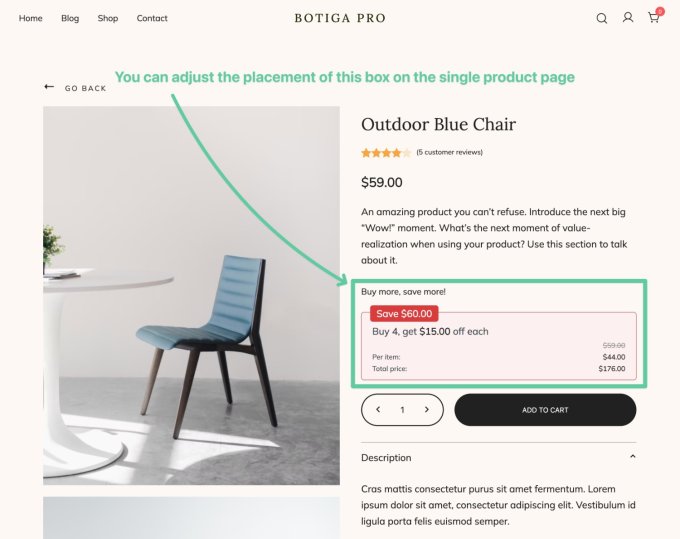
First, you can choose where to place the box using the Placement on product page options:
- Before add to cart – The box will appear above/before the add-to-cart button, as you can see in the screenshot above.
- After add to cart – The box will appear below/after the add-to-cart button.
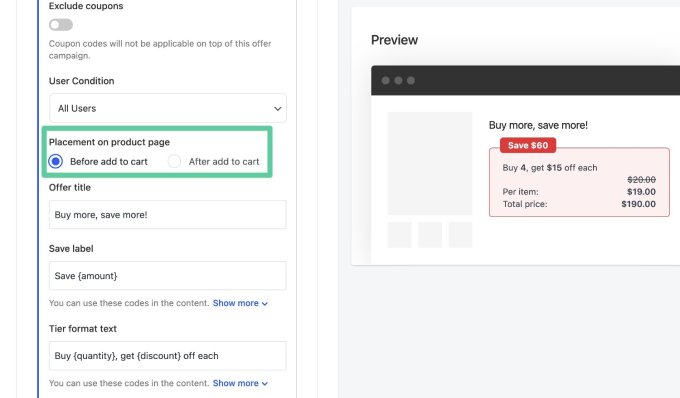
If you’re using our free Botiga WooCommerce theme, you’ll actually be able to control this from the WordPress Customizer instead, which gives you even more granular control. You can place it between any of the other elements on the page — here’s an example:
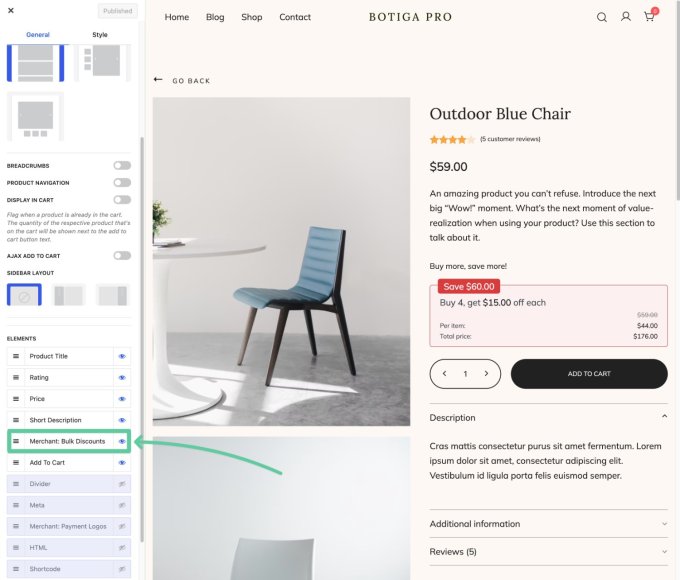
Also, it’s important to note that the exact placement will depend on how your theme is coded — all of the examples in this post are using the Botiga theme.
If you want more control, you can also manually place the discount box using a shortcode, which I’ll cover in the next section.
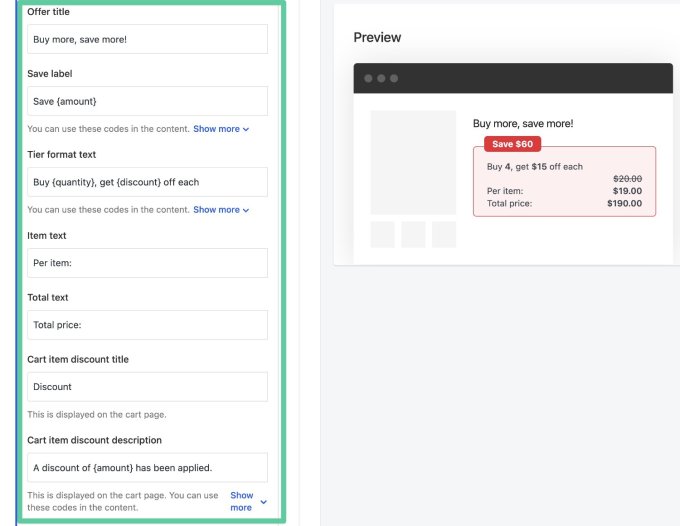
After choosing the placement, you’ll get a bunch of options to customize all of the labels and text in the box. You’re free to leave these as the defaults or customize them if you’d like.
You can also dynamically insert details of the offer using two merge tags:
- {amount} – The quantity that shoppers need to purchase to get the discount.
- {discount} – The discount that shoppers get on each item.
Below that, you can customize the colors and font size of the offer box:
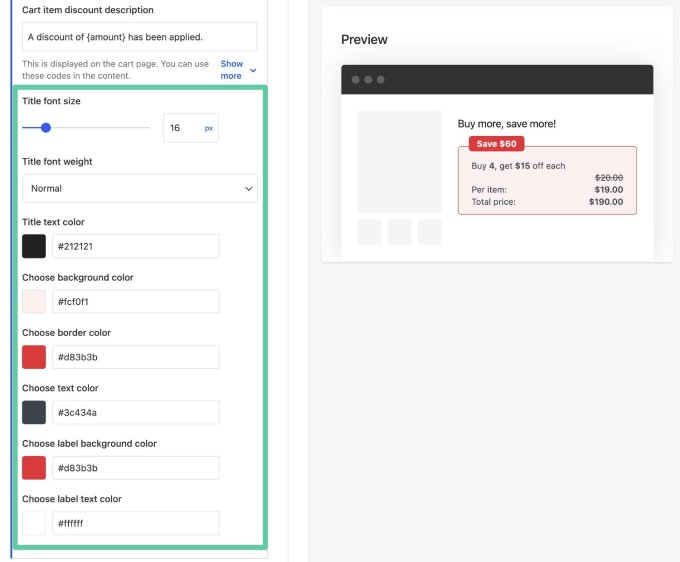
Once you’ve made all of your choices, make sure to click the blue Save button that appears in the top-right corner of the interface.
Optional: Manually Place the Discount Box(es) with a Shortcode
As I mentioned above, the default placement for the quantity-based discount boxes is either above or below the add-to-cart button, according to the settings above.
Or, you can place them in the Customizer, if you’re using the free Botiga theme.
However, if you want to have more control over where the boxes display and you’re not using the Botiga theme, you can also manually place the module using a shortcode.
This would allow you to manually place the Bulk Discounts module in the product editor, a page builder template, a Site Editor template, a theme template, and so on.
To use the shortcode, you’ll first need to enable the Use shortcode toggle, which is at the bottom of the module’s settings page:
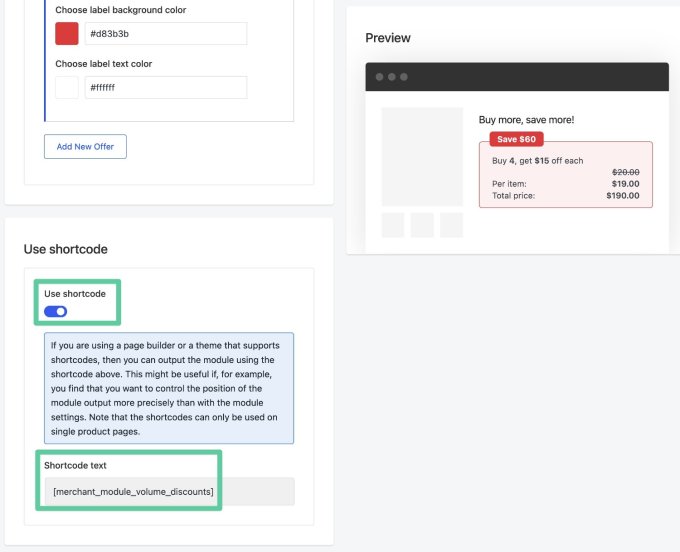
Once you’ve done that, you can use the following shortcode to place the quantity-based discount boxes on the product pages:
[merchant_module_volume_discounts]
4. Preview Your Quantity-Based Discount
At this point, your first quantity-based discount rule should be live on all of the products that meet your rule.
To test that everything is working as you intend it to, I recommend opening one of those products on the frontend of your store:
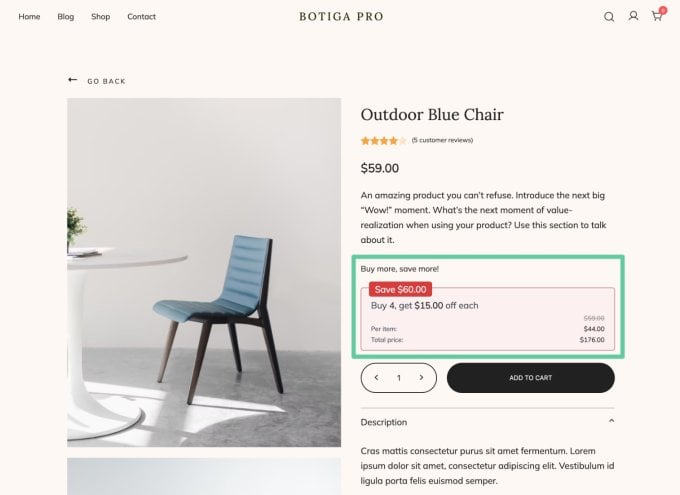
You can also add the relevant product quantity to your cart to make sure that the discount and final prices are behaving as you expect them to:
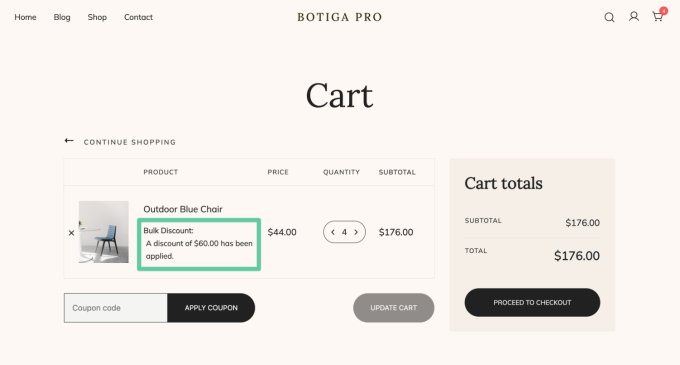
If anything looks off, you can go back to the offer’s settings and adjust things as needed.
5. Create Additional Bulk Discount Rules As Needed
If you want to create additional quantity-based discount rules, Merchant lets you set up unlimited offers on your store.
Just go back to the Bulk Discounts module’s settings and click the Add New Offer button to add a new one. You can repeat as many times as needed to set up all of the discounts that your store needs.
Video Walkthrough
Watch the video below for a step by step walkthrough of how to create bulk discounts in WooCommerce using Merchant Pro:
Get Started with WooCommerce Quantity-Based Discounts Today
That wraps up our tutorial on how to set up quantity-based discounts in WooCommerce using the Merchant Pro plugin.
In addition to the Bulk Discounts module, Merchant Pro also gives you access to 40+ other features to improve your store’s experience and boost revenue, all of which are 100% modular to keep your store lightweight and loading fast.
If you’re ready to get started, purchase your copy of Merchant Pro today.
If you want to try before you buy, you can also create a free, fully functioning demo site to try the Bulk Discounts module, along with all the other modules in Merchant Pro.
Do you still have any questions about how to set up bulk discounts in WooCommerce? Ask away in the comments!


